Adding LED strip into storage compartment and cabin floor
I always feels lack of brightness in my Perodua Axia glove box storage compartment and the stock car did not even provide some light in it but what to do as this is a budget small car for the general people.
The situation will get even worst at night that I and my wife are unable to search for things in need when needed including the centre console box or arm rest which I modified and install few months ago. To know more then please click HERE for maximising Pentair centre console box space.
For me, my Perodua Axia is not cheap though as it cost over RM40,000 and since its parent company is T brand so please consider the premium that I pay is for its quality and their well known heavy duty long life engine.
Unlike those luxury cars that cost over RM100,000 that have everything customers want, my current Perodua Axia is without anything that is short from our requirements and I got to live with it but apart from it we can install aftermarket parts all by ourself.
It is very annoyance to find the car storage compartment is underlit and I already have a plan to install some light into the glove box storage compartment and centre console box since I bought the car one year ago.
Finally, my lighting project started last month and it took me more than a month to complete this project including finding for the best light source to install in my car.
After surveyed few shops from electronics to car accessories selling various kinds of LED strip ranging from 240V to 12V, different colour output and some of them are not allowed to be truncated which also cost almost RM100, I still went back to the famous 99 car accessories shop that I favorite the most in BM which I bought many parts here before due to its consumer friendly prices and variety of items to choose from.

This LED strip I manage to find is sold at a very very very cheap price RM15 and also it can be cut into any length I wanted to with pure white colour light output.
Initial test was conducted for the whole LED strip to inspect the brightness and the output is really bright as it can lit up part of my living room.

I am curiously wanted to know the how much the current it draws and what is the maximum power it consume so I also tested the strip using multimeter to measure the current. (Rules for measuring current is always connect the circuit in series)

Then I proceed to desolder the middle of the strip which can be seen having 2 soldering points to join both strip together.

And I measure again the current and it is exactly half of the amount of the full LED strip current.

So formula for power calculation is Power = Volts x Ampere in which 12V it needed to turn on the LED as per mention in the specifications and 0.49A or 490mA current it draws equal to 5.88 watts of power this full LED strip consumed.
Things to begin with is of course finding for the power point to tap from inside the car cabin and the only section that I can think of is at the fuse box which I also work on it previously for my previous project Hiding dashcam cable guide for Perodua Axia HERE than tampering with any cables in the car which will void warranty.
So I bought the fuse box tap connector from another car accessories shop that cost RM10 and connect a longer cable to pull it until the area that I will be working to join all the wires together just hiding right beside the glove box compartment.

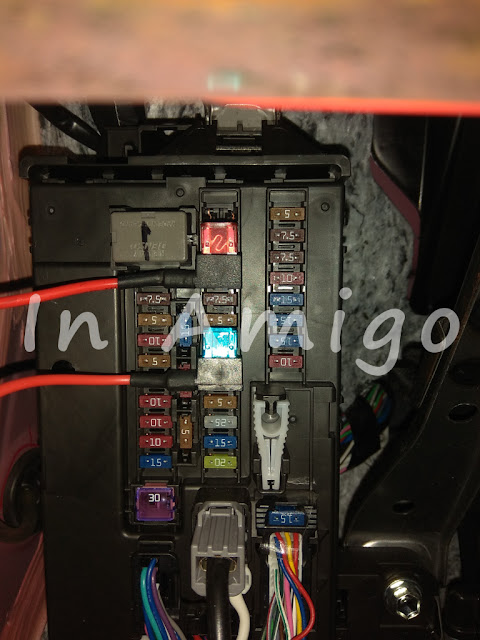
The fuse slot I will be use to tap into this time is the tail light point as my plan is to turn on the LED strip following the car exterior lamp but this slot at no# 26 is always supplied with current even when the car ignition is turned off and meaning it constantly flowing current during car ignition is off so it is impossible to turn on the LED strip 24 hours for 365 days a year.

Next I will have to change my plan maybe to tamper with the tail lamp cables or to find another slot that is following the car ignition and at last I manage to tap in slot no# 11 which is unused without any fuse in it.
After that I fix the ground cable attached to the car body metal part and dress up all the cables to pull right till the back of the aircond control panel area.

Remember to buy additional fuse to insert in the connector and realise the original slot is without any fuse then I quickly remove back the main fuse and just remain the secondary fuse to use it to power the LED strip.

Here lets begins with the important part and first I will do the lamp for the glove box storage compartment which the LED strip is inserted into a hard plastic straw which is also white in colour and reinforced with a satay stick at the back of the strip. (My method will be shown in later part)

Both end of the straw is secured with fast bond adhesive to prevent inside things from offset and then glued underneath the dashboard below the passenger airbag.

The LED strip is somewhat short enough just to light up the glove box storage compartment but the light is not shooting everywhere until it can be seen from other places.
Then I take off my centre console box and dismantle every layer of it just to DIY the LED strip.

My plan is just to light up inside the centre console box from front and rear side only by also covering the LED strip using white straw reinforced with satay stick at the back of the strip where the longest span of the strip will be covered with silicone paste as shown in picture below.

Of course both end of the 2 straws will also be secured with fast bond adhesive and after everything have done I proceed to assemble back the whole centre console box with some very nice black silicone cosmetic finish.

Meanwhile, thinking of this centre console box would need to be easily remove and install then next I shall fix a quick release connector for the power cable as hassle free as possible hiding inside the hand brake cover.

And since this project had started then why not just add in few extra lights for the cabin floor as well. Right?
So I go out to the same car accessories shop again to buy another same LED strip for my car floor cabin light.
Repeat the same procedure but this time soldering the LED strip by myself as I break apart one whole LED strip into 4 part short LED strips and adding extra cable by soldering joint, cover with electrical tape and wrap with shrink tube to safely protect the wire joint from short circuit with other metal.

Test the functionality and the brightness of the four LED strips and it all went pretty well.
Now all things is ready and it is time to install all things inside the car.
First, remove the hexagon screw at the rear of the centre console and take off the hand brake cover.

After unhook the head of the hand brake cover and remove another hexagon screw for the centre console gear panel cover.

There is another two plastic clips below the front centre console each besides driver and passenger foot rest area.

Method to remove the clips is by gently push in the middle round lock and then pull out the clip together with the middle round lock. (Beware not to push too hard in the middle or the clip will be broken)

Then the whole centre console will reveal itself and I plan to lay two pairs of wires through the front up to behind the dashboard each for the centre console storage box lamp and rear cabin floor lamp.

After a few minutes trying to shove in the cable and failed, eventually I try to tuck in my hand to see what is inside the front centre console and to my surprise it is actually the car main ECU unit lying in front of the gear panel.
Worrying it will do more damage to the part then I proceed to open up the floor carpet by removing the plastic panel cover at door foot rest. (Just pull up as it is clipped on)
Next there is a plastic clip below the fuse box that is holding the front carpet by rotate the clip anti-clockwise.

There is another 2 clips below the glove box hinge similar to the clip on the front centre console gear panel cover.

From here remove the balance cover connecting the foot rest cover to the dashboard below.

Now I can successfully remove the passenger floor carpet and manage to see the car ECU unit protected by a black plastic cover.

At last I am able to lay the cables nicely along the naked centre console area and perform a proper cable management before attach back all the covers.
Later I found there is a need for a hole at the gear panel cover to pass through the cables into the rear centre console as existing hole is already been used as a guide to connect and secure the gear panel cover and the hand brake cover.
Extra job need to do again to drill a hole to cater for the cable at the gear panel cover just within the coverage of the connecting guide between gear panel cover and the hand brake cover.

Finally, all the cables are connected to test the functionality and I can proceed to put back the hand brake cover.

Yet another hole need to be made to pass through the cable for the centre console storage box and this hole is shaped following the connector hiding under the box.

For all the lamp cables I connect them right behind the aircond control panel and on the right side of the glove box compartment all secured with cable tie.

For your information, my plan is to always turn on the lamp inside the glove box storage compartment and centre console storage box whenever the car is on but for the cabin floor wise I have done a switch located below the aircond circulation vent lever and above the 12V socket so I can opt to turn on or off when required.

I will not post how I will install the LED strip into my car as it is everyone different spot and different idea but for sure it will be installed on the right place as it will be.
Here is the final project outcome with impressive result and my wife love it very much!
I can tell that the LED lamp is very bright enough to illuminate the entire cabin floor and the light even reflected until the car ceiling where the cars behind me can see the white light when I was driving.
Even with such brightness I can estimate the total power consumption for all the LED strips in the glove box storage compartment, centre console box and cabin floor lamps turned on would be around 10W.
Total cost for this project is slightly more than RM50 with astonishing scene to improve my car interior decoration but somehow the time spent on this is more than I can imagine.
There is a later continued lighting project assignment but when I am free first la... OK? As I have worked on this project since 2 months ago and for sure this project is not a easy one to do.
Thanks for reading and I am also very appreciate if you are read until this end where I will post a bonus round for you on how to dismantle the automatic shift lever knob.
Find the two screws below the knob and use a philips head screwdriver to remove the two screws.
Precaution need to be taken when removing the two screws as the shift lever knob and the release button need to be pressed the whole time and if not then the knob will jump up and the release button will toss out together with the spring in it.

After completely take out the two screws then gently pull up the knob and slowly remove the release button with the spring inside.

Then from here you can see there is a half trapezoid don't know what its called thing attached on to a threaded shaft.

If you find your release button is a little loose or play then rotate the half trapezoid thing anti-clockwise or if the release button is tight then rotate it clockwise.
That's all for this time and if you have anything to say then please feel free to leave it down on the comment section below.
I always feels lack of brightness in my Perodua Axia glove box storage compartment and the stock car did not even provide some light in it but what to do as this is a budget small car for the general people.
The situation will get even worst at night that I and my wife are unable to search for things in need when needed including the centre console box or arm rest which I modified and install few months ago. To know more then please click HERE for maximising Pentair centre console box space.
For me, my Perodua Axia is not cheap though as it cost over RM40,000 and since its parent company is T brand so please consider the premium that I pay is for its quality and their well known heavy duty long life engine.
Unlike those luxury cars that cost over RM100,000 that have everything customers want, my current Perodua Axia is without anything that is short from our requirements and I got to live with it but apart from it we can install aftermarket parts all by ourself.
"No harms, right?"
It is very annoyance to find the car storage compartment is underlit and I already have a plan to install some light into the glove box storage compartment and centre console box since I bought the car one year ago.
Finally, my lighting project started last month and it took me more than a month to complete this project including finding for the best light source to install in my car.
After surveyed few shops from electronics to car accessories selling various kinds of LED strip ranging from 240V to 12V, different colour output and some of them are not allowed to be truncated which also cost almost RM100, I still went back to the famous 99 car accessories shop that I favorite the most in BM which I bought many parts here before due to its consumer friendly prices and variety of items to choose from.

This LED strip I manage to find is sold at a very very very cheap price RM15 and also it can be cut into any length I wanted to with pure white colour light output.
Initial test was conducted for the whole LED strip to inspect the brightness and the output is really bright as it can lit up part of my living room.

I am curiously wanted to know the how much the current it draws and what is the maximum power it consume so I also tested the strip using multimeter to measure the current. (Rules for measuring current is always connect the circuit in series)

Then I proceed to desolder the middle of the strip which can be seen having 2 soldering points to join both strip together.

And I measure again the current and it is exactly half of the amount of the full LED strip current.

So formula for power calculation is Power = Volts x Ampere in which 12V it needed to turn on the LED as per mention in the specifications and 0.49A or 490mA current it draws equal to 5.88 watts of power this full LED strip consumed.
"OK. Recalls back subject I learned previously in school..."
Things to begin with is of course finding for the power point to tap from inside the car cabin and the only section that I can think of is at the fuse box which I also work on it previously for my previous project Hiding dashcam cable guide for Perodua Axia HERE than tampering with any cables in the car which will void warranty.
So I bought the fuse box tap connector from another car accessories shop that cost RM10 and connect a longer cable to pull it until the area that I will be working to join all the wires together just hiding right beside the glove box compartment.

The fuse slot I will be use to tap into this time is the tail light point as my plan is to turn on the LED strip following the car exterior lamp but this slot at no# 26 is always supplied with current even when the car ignition is turned off and meaning it constantly flowing current during car ignition is off so it is impossible to turn on the LED strip 24 hours for 365 days a year.

Next I will have to change my plan maybe to tamper with the tail lamp cables or to find another slot that is following the car ignition and at last I manage to tap in slot no# 11 which is unused without any fuse in it.

After that I fix the ground cable attached to the car body metal part and dress up all the cables to pull right till the back of the aircond control panel area.

Remember to buy additional fuse to insert in the connector and realise the original slot is without any fuse then I quickly remove back the main fuse and just remain the secondary fuse to use it to power the LED strip.

Here lets begins with the important part and first I will do the lamp for the glove box storage compartment which the LED strip is inserted into a hard plastic straw which is also white in colour and reinforced with a satay stick at the back of the strip. (My method will be shown in later part)

Both end of the straw is secured with fast bond adhesive to prevent inside things from offset and then glued underneath the dashboard below the passenger airbag.

The LED strip is somewhat short enough just to light up the glove box storage compartment but the light is not shooting everywhere until it can be seen from other places.
Then I take off my centre console box and dismantle every layer of it just to DIY the LED strip.

My plan is just to light up inside the centre console box from front and rear side only by also covering the LED strip using white straw reinforced with satay stick at the back of the strip where the longest span of the strip will be covered with silicone paste as shown in picture below.

Of course both end of the 2 straws will also be secured with fast bond adhesive and after everything have done I proceed to assemble back the whole centre console box with some very nice black silicone cosmetic finish.

"Feels like shit, man!!!"
Meanwhile, thinking of this centre console box would need to be easily remove and install then next I shall fix a quick release connector for the power cable as hassle free as possible hiding inside the hand brake cover.

And since this project had started then why not just add in few extra lights for the cabin floor as well. Right?
So I go out to the same car accessories shop again to buy another same LED strip for my car floor cabin light.
Repeat the same procedure but this time soldering the LED strip by myself as I break apart one whole LED strip into 4 part short LED strips and adding extra cable by soldering joint, cover with electrical tape and wrap with shrink tube to safely protect the wire joint from short circuit with other metal.

Test the functionality and the brightness of the four LED strips and it all went pretty well.
"Yeah!!! My workmanship is very good..."
Now all things is ready and it is time to install all things inside the car.
First, remove the hexagon screw at the rear of the centre console and take off the hand brake cover.

After unhook the head of the hand brake cover and remove another hexagon screw for the centre console gear panel cover.

There is another two plastic clips below the front centre console each besides driver and passenger foot rest area.

Method to remove the clips is by gently push in the middle round lock and then pull out the clip together with the middle round lock. (Beware not to push too hard in the middle or the clip will be broken)

Then the whole centre console will reveal itself and I plan to lay two pairs of wires through the front up to behind the dashboard each for the centre console storage box lamp and rear cabin floor lamp.

After a few minutes trying to shove in the cable and failed, eventually I try to tuck in my hand to see what is inside the front centre console and to my surprise it is actually the car main ECU unit lying in front of the gear panel.
Worrying it will do more damage to the part then I proceed to open up the floor carpet by removing the plastic panel cover at door foot rest. (Just pull up as it is clipped on)
Next there is a plastic clip below the fuse box that is holding the front carpet by rotate the clip anti-clockwise.

There is another 2 clips below the glove box hinge similar to the clip on the front centre console gear panel cover.

From here remove the balance cover connecting the foot rest cover to the dashboard below.

Now I can successfully remove the passenger floor carpet and manage to see the car ECU unit protected by a black plastic cover.

At last I am able to lay the cables nicely along the naked centre console area and perform a proper cable management before attach back all the covers.
Later I found there is a need for a hole at the gear panel cover to pass through the cables into the rear centre console as existing hole is already been used as a guide to connect and secure the gear panel cover and the hand brake cover.
Extra job need to do again to drill a hole to cater for the cable at the gear panel cover just within the coverage of the connecting guide between gear panel cover and the hand brake cover.

Finally, all the cables are connected to test the functionality and I can proceed to put back the hand brake cover.

Yet another hole need to be made to pass through the cable for the centre console storage box and this hole is shaped following the connector hiding under the box.

For all the lamp cables I connect them right behind the aircond control panel and on the right side of the glove box compartment all secured with cable tie.

For your information, my plan is to always turn on the lamp inside the glove box storage compartment and centre console storage box whenever the car is on but for the cabin floor wise I have done a switch located below the aircond circulation vent lever and above the 12V socket so I can opt to turn on or off when required.

"Yes! Crazy ha?"
I will not post how I will install the LED strip into my car as it is everyone different spot and different idea but for sure it will be installed on the right place as it will be.
Here is the final project outcome with impressive result and my wife love it very much!
I can tell that the LED lamp is very bright enough to illuminate the entire cabin floor and the light even reflected until the car ceiling where the cars behind me can see the white light when I was driving.
Even with such brightness I can estimate the total power consumption for all the LED strips in the glove box storage compartment, centre console box and cabin floor lamps turned on would be around 10W.
Total cost for this project is slightly more than RM50 with astonishing scene to improve my car interior decoration but somehow the time spent on this is more than I can imagine.
There is a later continued lighting project assignment but when I am free first la... OK? As I have worked on this project since 2 months ago and for sure this project is not a easy one to do.
Thanks for reading and I am also very appreciate if you are read until this end where I will post a bonus round for you on how to dismantle the automatic shift lever knob.
Find the two screws below the knob and use a philips head screwdriver to remove the two screws.
Precaution need to be taken when removing the two screws as the shift lever knob and the release button need to be pressed the whole time and if not then the knob will jump up and the release button will toss out together with the spring in it.

After completely take out the two screws then gently pull up the knob and slowly remove the release button with the spring inside.

Then from here you can see there is a half trapezoid don't know what its called thing attached on to a threaded shaft.

If you find your release button is a little loose or play then rotate the half trapezoid thing anti-clockwise or if the release button is tight then rotate it clockwise.
That's all for this time and if you have anything to say then please feel free to leave it down on the comment section below.
Compare the Perodua Aruz Review with other cars !
ReplyDeleteHaha... I did not want to review cars in my blog here coz there are plenty of websites to compare
DeleteHi bro, need help on this diy.
ReplyDelete1. The fuse is positve and ground direct connect to body?
2. Fuse slot #11,the led only working when turn on ignition right
May i get ur contact no? My email sidqara@gmail.com.
Thanks for reading bro... the fuse current is supplied from the car battery and yes it is positive... you can just connect the negative wire from the LED strip to the car body... Fuse slot no# 11 will just activate only if the ignition is on... if your car ignition is turned off then the slot no# 11 will also follows to deactivate... you can email to me at michaelleewk@gmail.com
Delete